Thursday, April 3, 2008

Sausage Pepper and Onion Stromboli

Sausage Pepper and Onion Stromboli

This dish captures the traditional taste of Italian sausage with peppers and onions, but adds a that delicious taste of a fresh baked crust with sesame seeds. The crust really amplifies the flavor of the sausage and makes a nice portable container for on-the-go families. It has many of the benefits of Lizabetti's Ham and Cheese Stromboli, but also has a more sophisticated combination of tastes. I actually like it better, but my kids prefer the ham and cheese version.

Like our other Italian Dishes, this dish is just plain fun to eat. You can serve it with a spinach salad for a light dinner, or take it to work for lunch.
This also makes great game time munchies when you are watching your beloved Celtics or Patriots.


Ingredients:
  • 2-4 Sweet or garlic Italian sausage
  • 1 ball of pizza dough, I get mine at a local pizza joint. Allow the dough to rise before using.
  • 6-8 oz Mozzarella cheese, shredded
  • 1 portabello mushroom cap
  • 2 tablespoons pickled pepper rings
  • 1/2 onion, coarsely chopped
  • 1 handful of corn meal
  • 1 tablespoon of olive oil
  • 1 tablespoon of milk
  • 2 table spoons of sesame seeds
  • 1-2 teaspoons garlic, chopped

Directions:
  1. Brush the mushroom cap with garlic and olive oil. .
  2. Grill for 8 minutes per side over medium high heat. If you do not have a grill, you can use a non-stick pan.
  3. Slice the mushroom and let stand for a few minutes.
  4. Grill sausages slowly over medium heat, allow the grease to drain. You can cut the sausage in half length-wise after it is browned to help speed the cooking process. I grilled the sausage and mushrooms at the same time, though the sausages take at least 30 minutes.
  5. slice the sausage into disk shaped pieces about 1/4 inch thick.
  6. Roll out the dough, using the corn meal to prevent sticking to your board.
  7. Lay out the dough on a cookie sheet.
  8. Spread the sausage on the dough, top with onions, peppers, and mushrooms.
  9. Spread the shredded cheese over top.
  10. Roll up the dough around the ingredients.
  11. Press down the ends with a fork to seal, this is important so that you do not lose your cheese.
  12. Poke holes with a tooth pick all along the top. The holes should be spaced at least 1 inch apart. This is important so that your pie does not explode in the oven.
  13. Brush the surface of the dough with milk, this will help the sesame seed stick to the dough.
  14. Sprinkle with sesame seeds.
  15. Bake at 375o for 30 minutes.
  16. Let stand at room temperature for at least 10 minutes before cutting.

See All of Our Recipes

Copyright © 2007, 2008 Lizabetti.com, All Rights Reserved


Sunday, March 30, 2008

Quick and Easy Polenta

This is another one of my mom's recipe. It is quick and easy to do. All the grandkids love it. It can be a great side dish for just about any main course. It works great as an after school snack too.


INGREDIENTS

  • 1/2 cupsof fine milled cornmeal
  • 1 cup of coarse ground cornmeal
  • 4 1/2 cups of stock
  • 2 tbsp butter
  • 1 tsp of salt

INSTRUCTIONS

  1. Place the cornmeal in a mixing bowl and using a whisk, give it a few turns. It will take any lumps out of the cornmeal and make it easier to add to the stock.
  2. Heat the stock to boiling in a medium size pan. Then turn the heat down to medium.
  3. Using a whisk, keep stirring the stock rapidly, while slowly adding the cornmeal until it is all incorporated into the stock. It is really crucial to keep the stock moving with the whisk while the cornmeal is going in or you will get lumps.
  4. Keep stirring until the mixture is hot and starts to bubble. Turn the heat off.
  5. Continue to stir. Add the butter and stir it in.
  6. Add the salt and stir it in. Taste and add additional salt if desired.
  7. Pour the mixture in baking pan. Let it cool completely.
  8. Remove from the pan and cut it into squares or triangles.
  9. To finish the polenta, you have 2 options:
  • The low fat way: Use a cookie sheet with a wire rack to bake the polenta pieces. Using a silicone brush, lightly brush olive oil on both sides and bake at 425F for about 30 min or until golden brown. You can leave it longer if you like them a little more brown. You don't need much olive oil. I usually get away with about 2 tablespoon for the entire batch. It will have a nice crust, but still be tender on the inside. Re-heats very nicely, so its great as a quick snack.
  • Coat the bottom of a heavy fry pan with generous amount of olive oil. Heat oil until hot and saute the polenta until golden brown on both sides.
  • Serve with pasta sauce as a main entree or with a side of sauce as a snack or side dish.

See All of Our Recipes

Copyright © 2007, 2008 Lizabetti.com, All Rights Reserved


Wednesday, March 26, 2008

Spring Grilled Feast

After a long and miserable winter I have been just itching to get out and grill. I have been craving the smokey taste of a good meal cooked in the Stone Pony, my outdoor stone oven. Easter Sunday had good weather, and my whole family was eager to have a spring feast.

This luscious dinner features a leg of lamb, turkey wings, and  natural casing franks. The side dishes are light to compensate for all the meat. We served it with arugula, radishes, Armenian cucumbers and tomatoes. We also included Tahini Dipping Sauce and Yogurt Cucumber Salad.  There are enough leftovers to make lunches for a family of four for a week.

You don't need a stone oven to make this delicious feast, a standard charcoal or gas grill will do fine. I would suggest two outstanding accessories that you can buy for your grill that open up a world of possibilities.

Get yourself a rotisserie kit for your grill, which you can buy at any hardware or home store.  These are easy to install motorized affairs which make it easy to cook meat just right because it prevents burning. Ribs, chicken, turkey, and sausage all come out perfect when you use the rotisserie.

You can also get a rotisserie basket, which is the greatest thing to have. A basket allows you to cook things like sausage, chops, or chicken drumsticks
without losing half of your food into the fire.

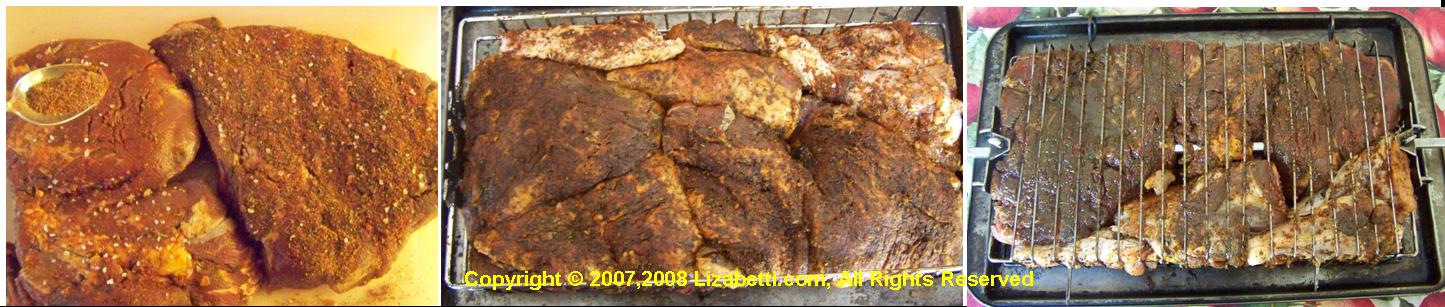
For this repast I marinated a leg of lamb in my Mediterranean Dry Rub. I also had some turkey wings in my freezer from Thanksgiving, and my son was craving grilled hot dogs. I won't even mention that we also made a brown sugar ham indoors, but that is a story for another day.

A leg of lamb is very easy to de-bone if you allow yourself to be sloppy. Don't worry about leaving too much meat on the bone, you can always grill the meaty bone and serve it to your guest of honor, or eat it yourself.

Ingredients:

  • 1 medium leg of lamb, de-boned
  • 4 whole turkey wings
  • 1 pack of high quality natural casing beef franks
  • 4 tablespoons of chopped garlic
  • 6 cloves whole garlic
  • Coarse sea salt to taste.


Directions:

  1. You must prep your meats at least 24-48 hours in advance. Hint: I prep mine before vacuum sealing and freezing, so that I can always be ready for a party.
  2. De-bone the leg of lamb by cutting away the meat around the bone. Don't worry about cutting it too close.
  3. If there is a thick fat rind on the leg, peel most of it away. Again, no need to be precise, some fat helps to baste the leg during cooking. Most of the fat will drip off anyways.
  4. Cut the turkey wings along the joint with a heavy, sharp knife. For each wing this will create a piece that looks like a drumstick and another that looks like a wing tip. Both will be delicious.
  5. Tenderize the leg by pounding with a meat hammer and poking it all over with a fork. You can also buy a gadget full of pins that can tenderize meat.
  6. With a narrow, sharp knife make incisions in the lamb and push in the cloves of garlic.
  7. Lightly sprinkle both sides with sea salt.
  8. coat the meat on both sides with chopped garlic.
  9. Sprinkle the Mediterranean Dry Rub liberally on bot sides of the meat and pat down.
  10. Salt, garlic, and dry rub the turkey wings the same way that you did the lamb.
  11. Let all the meat sit covered in the fridge for at least 1 day. You should remove the meat from the fridge at least 2 hours before cooking so that it comes to room temperature.
  12. Rub the inside of the grill basket with oil, or spray with cooking spray. This is to prevent meat loss through sticking.
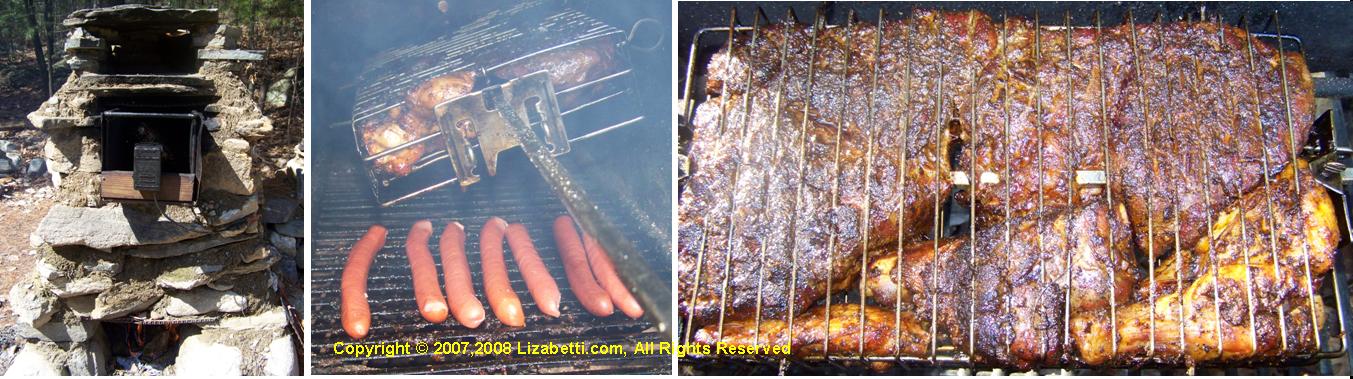
  13. Stuff the lamb into the basked and use the turkey wings to fill in the gaps. You want the basket to be overstuffed so that things are really tight. This is because the meat will shrink and you don't want it moving around or falling into the fire.
  14. Push the rotisserie skewer through the basket only after you have stuffed the meat. The skewer will make things even more snug.
  15. Install the skewered basked into your rotisserie on the grill. The picture above shows my rotisserie installed in the Stone Pony.
  16. Cook over low heat for at least 2 hours, my leg was large so I cooked it for 3 hours.
  17. Toward the end of the cooking time slide the hot dogs onto the grill under the rotating basket. This will cause the juices from the meat to flavor the hot dogs as they cook.
  18. Cook the hot dogs about 5 minutes on each side.
  19. Take your time enjoying this meal and don't eat this much meat too often.
  
Copyright © 2007, 2008 Lizabetti.com, All Rights Reserved